Logo of TAGGRS, written in blue and with a small favicon
HomeServer-side Tracking
Start for free
Introduction
Get started
Get started with TAGGRSSet up Google Tag ManagerAdd the GTM Data LayerConfigure GTM transformationsTest the setupDebuggingAnalytics dashboard
Migrate from Google CloudMigrate from hosting
Shortcuts
GTM Copy PasteReady-made templates
GA4 Server-side Tracking
Setup in GTMCreate GA4 Event TagsGA4 tag setup in server containerE-commerce events in GTM
Google Ads Server-side Tracking
Install Conversion LinkerSet up Conversion TrackingConfigure Enhanced ConversionsDeploy Remarketing Tags
Facebook Server-side Tracking
Set Meta PixelImprove your EMQ ScoreInstall Meta CAPIMeta Events DeduplicationMeta CAPI Gateway
LinkedIn Server-side Tracking
Install LinkedIn Insight TagSet up LinkedIn CAPILinkedIn Events Deduplication
TikTok Server-side Tracking
Set up TikTok PixelInstall TikTok Events APITikTok Events Deduplication
Pinterest Server-side Tracking
Set up Pinterest TagConfigure Pinterest Conversions APIPinterest Events Deduplication
Snapchat Server-side Tracking
Set up Snap PixelSnapchat Conversions APISnapchat Events Deduplication
TAGGRS Tracking Tags and Tools
Tracking TagsGoogle Service Account integrationsGTM LogsProfit TrackingData Enricher ToolWebhooks TesterEnhanced Tracking ScriptMulti Domain ToolClick ID RecoveryConsent Tool
Configurations
Billy Grace Server-side TrackingLeadPages Server-side TrackingPiwik PRO Server-side TrackingCDN Server-side TrackingShopify Server-side TrackingActiveCampaign Server-side TrackingKlaviyo Server-side Tracking
Server-side Tracking for e-commerce
Shopify Data LayerShopware Data LayerMagento Data LayerWooCommerce Data LayerPrestashop Data LayerLightspeed Data Layer
Consent Management server-side
Activate Consent ModeConfigure TAGGRS with Axeptio

Migrate from Google Cloud to TAGGRS

This guide provides a streamlined migration path to move your server-side Google Tag Manager (sGTM) setup from Google Cloud to TAGGRS. Follow these steps to ensure a smooth transition and maintain data integrity.

Overview

Switching your hosting in Google Cloud to TAGGRS involves six steps:

1. Create a TAGGRS account
2. Create a new TAGGRS server container
3. Get the configuration code from GTM
4. Configure the container with TAGGRS
5. Migrate tags and triggers
6. Configure DNS and tracking

The following sections give you more detail about each step.

1. Create a TAGGRS account

Sign in to the TAGGRS platform.

2. Create a new TAGGRS server container

The reason you need to create a new server container is because Google automatically configures the server container to a Google Cloud setup and it cannot be modified later to a TAGGRS configuration. So, here is how you create a new one:
1.
Fill in your container details and your subdomain.
2.
Choose your server location. We recommend you choosing the location nearest to you.

3. Get the configuration code from GTM

1.
Navigate to: Google Tag Manager → Admin → + (plus symbol).
2.
Name the container.
3.
Click Server and then Create to approve.
4.
Select Manually provision tagging server and your configuration code will appear.

4. Configure the container with TAGGRS

1.
Switch to TAGGRS dashboard and add the configuration code in the Container configuration field.
2.
Choose your subdomain.
Logo of TAGGRS Server-side Tracking: a light blue circle with two blue angle brackets
Using your own subdomain minimizes risk in maintaining tracking options and resistance to ad blockers. You still need to reconfigure your subdomain (just as you did with Google Cloud).
‍
• Keep your own subdomain: Change DNS records (Note, AAA become A records)
• New subdomain created: Add DNS records

By changing your DNS records, you make sure the data runs through TAGGRS instead of Google Cloud. These DNS records can be found in your dashboard. See how to configure your DNS with TAGGRS.
3.
Click Continue.
4.
Choose your plan. If you want to know all the benefits of each plan, get a quick overview in the pricing page.
5.
Double-check all the details in the Overview and then click Create container.
Logo of TAGGRS Server-side Tracking: a light blue circle with two blue angle brackets
The reason you need to create a new server container is because Google automatically configures the server container to a Google Cloud setup and it cannot be modified later to a TAGGRS configuration.

5. Migrate tags and triggers

1.
Google Cloud container: Select Admin → Export Container.
2.
TAGGRS container: Go to Admin → Import container.
For granular migration, use the TAGGRS Copy Paste tool. It automatically transfers individual tags and triggers between containers.

6. Update data flow to the server container

1.
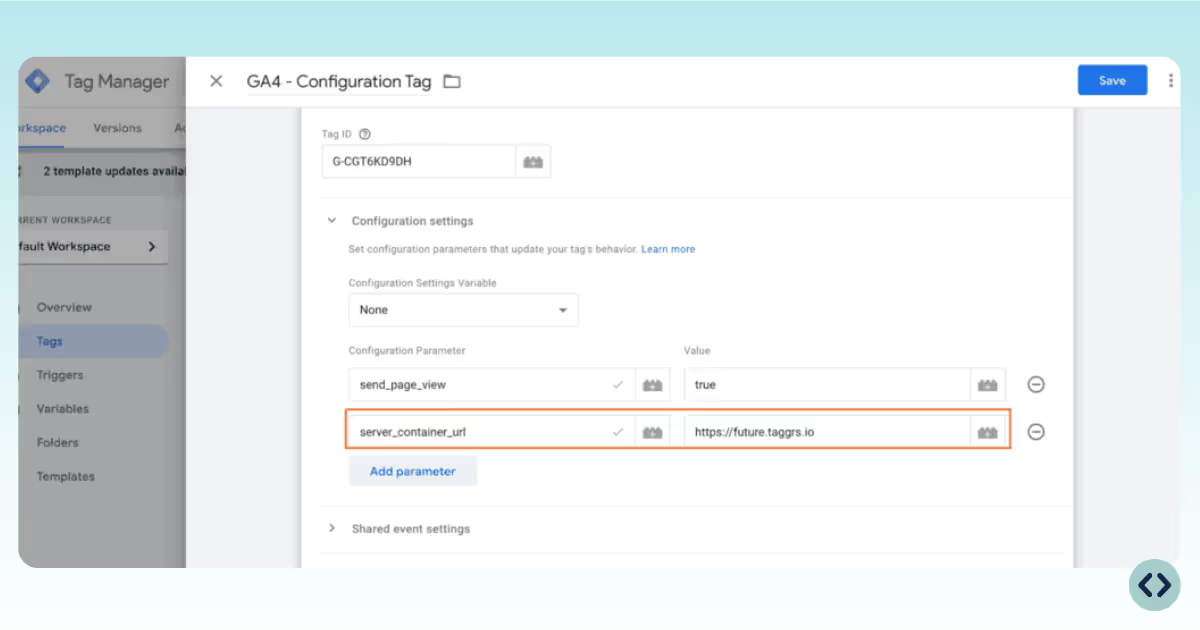
Once your server container is configured, update your web container to send data to the new TAGGRS endpoint. Export Container.
2.
Add your TAGGRS subdomain to your GA4 Configuration Tag or other relevant tags to route events through your server container.
Screenshot from Google Tag Manager showing how to implement the GA4 Configuration Tag
3.
After verifying data flow, your migration is complete. You can now explore and enjoy all the TAGGRS server-side tracking features.

Useful resources

Let us take care of the migration
Need extra help? Visit our Support Center
Previous
Server-side Tracking dashboard
Next
Migrate from hosting
Copyright © 2025 TAGGRS. All right reserved.
TABLE OF CONTENTS
Overview1. Create a TAGGRS account2. Create a new TAGGRS server container3. Get the configuration code from GTM4. Configure the container with TAGGRS5. Migrate tags and triggers6. Update data flowUseful resources